You’re not alone if you’re nervous about tempering chocolate. Tempering is one of the most difficult skills to learn in the world of chocolate making. In this blog post, we’ll take some of the mystery out of tempering by explaining the details of table tempering chocolate and guide you step by step in this delicate process.
What is tabletop tempering?
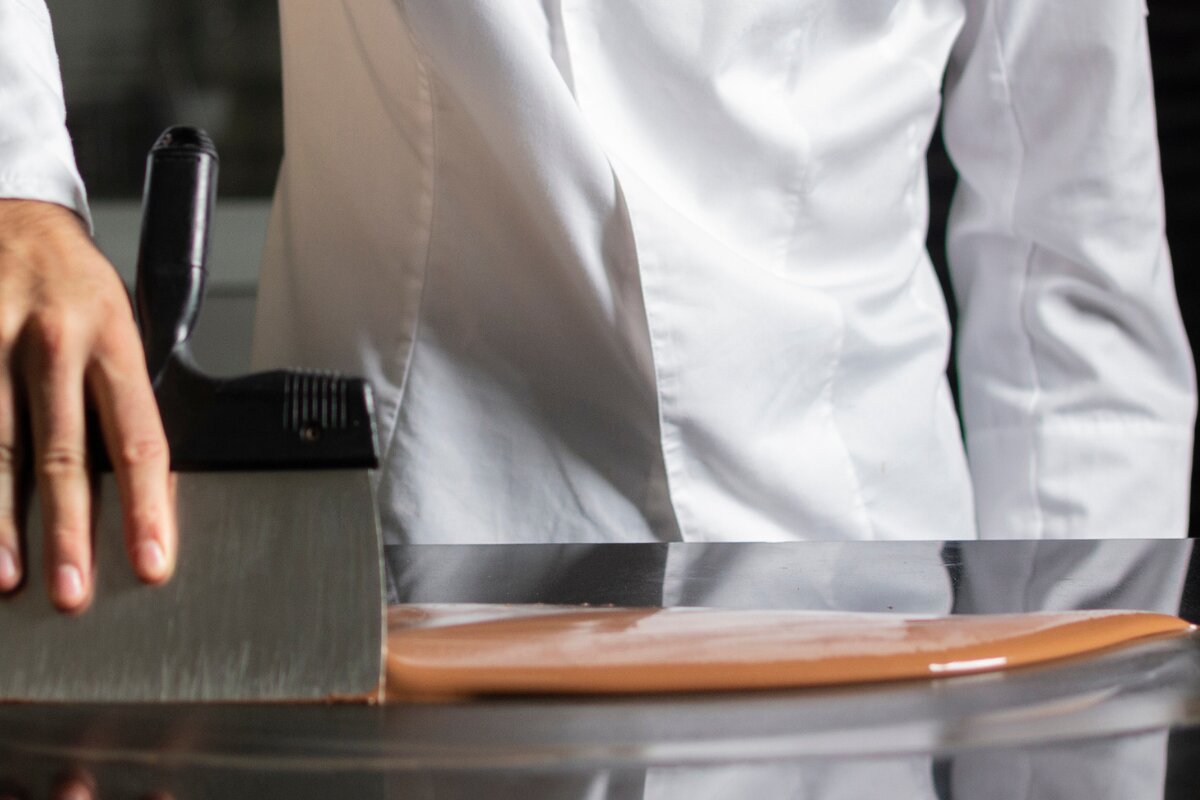
Tabletop tempering, also known as the “table method” or “tabling method”, is a technique used in chocolate making to control the crystalline structure of chocolate as it hardens. This method is hands-on and allows chocolatiers and chocolate-makers to feel the temperature and texture of the chocolate as they guide it through its tempering process. For those who are just getting started in the world of chocolate, this may not be the best place to start. It’s a traditional approach to tempering that requires skill and experience to achieve consistent results. There are simple methods of tempering that can be mastered first, before learning how to successfully table temper. And if you really want to become an expert in tempering, it’s helpful to understand the science behind the technique.
What types of chocolate tempering methods exist?
There are several tempering methods for chocolate, each with its own advantages and challenges:
Tabletop Tempering
This traditional method of tempering chocolate involves pouring melted chocolate onto a cool marble or granite surface, spreading and gathering the chocolate to achieve temper. Table tempering is the most challenging technique and if you don’t have a large stone surface, you’re out of luck.
Seeding Method
In this technique, small bits of tempered chocolate or cocoa butter are added to the melted chocolate in order to “seed” the chocolate and temper it. This is a quick and convenient method that can be done with a microwave, using powder such as Mycryo, or a paste such as cocoa butter silk.
Chocolate Tempering Machine
Specialized tempering machines are used in home and commercial settings to control the temperature of chocolate through precise heating and cooling cycles. Automation is very helpful if you don’t want to watch over every step of the process.
Continuous Tempering Machine
This method uses a machine with a continuous flow of chocolate through various heating and cooling zones to maintain a consistent temper. These systems are typically found in commercial chocolate facilities.
The choice of tempering method depends on factors such as the quantity of chocolate, the equipment available and the desired outcome. In artisanal chocolate making, the tabling and seeding methods are common but large-scale production often relies on machine-based tempering for efficiency and consistency.
When is the table tempering method used?
Table tempering is the most common method for tempering small batches of chocolate. For chocolatiers who focus on craftsmanship and hand-made quality, the tabletop tempering method is often preferred. It allows for a hands-on approach and a closer connection with the chocolate throughout the tempering process.
Small Batches
For small batches of chocolate, the tabletop method is a practical way to temper the chocolate. This technique provides more control over the tempering process, ensuring that each batch is carefully tempered.
Limited Equipment
Chocolatiers and home chocolate-makers with limited access to specialized tempering machines may use the tabletop method. It requires only minimal equipment: a marble or granite surface and spatulas.
Pastry or cooking school
In chocolate-making workshops, culinary schools, or educational settings, the tabletop method is often used to teach the fundamentals of tempering. A tactile and visually instructive process, this technique allows participants to engage with the chocolate as it cools and hardens.
How do you table temper chocolate?
Tempering chocolate involves a series of steps to melt the chocolate, cool it, and then bring it back to the right working temperature. Sounds simple, but it’s not. Here’s a step-by-step tempering guide to help you master the technique:
Materials Needed:
- High-quality chocolate (dark, milk, or white)
- Marble or granite surface
- Spatulas or bench scrapers
- IR Thermometer (a contactless thermometer will make life much easier)
Steps:
- Chop the chocolate
To start, chop the chocolate into small, uniform pieces. This helps with even melting.
- Melt the chocolate
To melt chocolate, use a double boiler or microwave. Heat the chocolate gently, stirring regularly to avoid overheating. The goal is to melt the chocolate until it reaches a temperature above its melting point, typically 110-120F.
- Spread chocolate on the stone surface
Pour 2/3 of the melted chocolate onto your marble or granite surface.
- Spread thinly
Use a spatula or bench scraper to spread the chocolate thinly across the surface. There’s no need to be gentle with the chocolate. In fact, the spreading action will encourage the formation of the desired cocoa butter crystals.
- Gather the chocolate
Gather the chocolate back to the center using the scrapers and repeat the process until the chocolate starts to cool. You should be actively working the chocolate the entire time. Once the chocolate begins to thicken and set at the edges as you spread it out, you are done (this is usually about 5-7 degrees below the working temperature listed below).
- Combine and mix
With a final gather, collect the chocolate and add it back into the bowl with the remaining melted chocolate. Mix and fold the chocolate together until it reaches a temperature that is suitable for molding or dipping. Here are typical working temperatures:
- Dark chocolate: 88–90°F (31–32°C)
- Milk chocolate: 84–86°F (29-30°C)
- White chocolate: 82–84°F (28–29°C)
- Test the temper
To test if your chocolate is properly tempered, dip a knife or spatula into the melted chocolate. If it hardens in a matter of minutes and has a glossy finish, your chocolate is successfully tempered (you can put it in the refrigerator to speed up the testing process). If the chocolate melts when you touch it or starts to develop white streaks, it’s time to try again.
- Using the tempered chocolate
Once tempered, the chocolate can be used for molding, coating, or any desired application. If you don’t have a way to keep the chocolate at the desired working temperature, your working time will be limited since the chocolate will slowly get thicker and thicker. Make sure that you have everything set and ready to go once your temper steps are complete.
Remember that tempering requires practice and precision. Accurate temperature control is key to achieving a smooth, glossy finish in your chocolate creations.
Finally, as the saying goes, “practice makes perfect” and that’s certainly the case with tempering. The nice part is that if you have a temper failure, you can simply reheat the chocolate and start over. As you practice table tempering more and more, you will start to recognize the look of the chocolate and the feel of the chocolate to know when you’ve hit the perfect temper.
For more great articles, check out the rest of our CocoTerra blog.
If you have any questions or comments, feel free to contact us through our social media channels. We are @cocoterra_co on Instagram and Pinterest and @cocoterraco on X (aka Twitter) and Facebook.

